Important Notes on the Maker
We put a lot of time and effort into custom building the Maker for you. Please take a few minutes to read this page as it contains important information and if you have any questions please contact us.
sales@wheelworks.co.nz | +64 4 387 3592
Quick jump to:
Brakepads | Tyre Pressure Suggestions | Hints on fitting tyres | What Cassette Spacers Do I Need? | Exhaust Heat
Brakepads
Carbon rims require different brakepads. Why?
Abrasiveness: Carbon-specific pads are softer so they won’t wear into the rim.
Heat management: Your brakes work by converting kinetic energy (you moving forward) into heat energy. Aluminium is a fantastic conductor of heat which means it’s good at dissipating and getting rid of it, which results in good brake performance. Carbon is a very poor conductor of heat, so carbon-specific brakepads are needed to control the amount of heat buildup, and pull it away from the rim.
What this means is that you’ll need to fit a pair of Maker carbon-specific brakepads and use them only on your Maker carbon rims. Because these pads are very soft they’ll wear out quickly on aluminium rims, and you run the risk of small aluminium shards getting stuck in the brakepad which will then damage your carbon rims.
Required Brakepads
We provide free brakepads for the life of the Maker Carbon rim to it’s original owner.
Our carbon wheels include a pair of carbon-specific brakepads designed specifically for the Maker Carbon rims. Maker-specific brakepads are much softer than normal brakepads and will not wear into the rim. It’s very important that you use only Maker-specific brakepads on the Maker Carbon rims, and that Maker brakepads are only used on Maker Carbon rims.
Brakepad life is very good but replacements for Shimano, SRAM or Campagnolo brakes are available from Wheelworks when they’ve worn out. The brakepads are considered worn-out when the groves are no longer visible. There is also a ‘limit’ line on the brakepad. We typically see a set of brakepads lasting 8,000-10,000km. To request new brakepads please order here.
sales@wheelworks.co.nz | +64 4 387 3592
You must use the Maker brakepads with your Maker Carbon rims. We can’t stress this enough and your Maker’s lifetime warranty will be void by using any other pad.
For our Maker Alloy wheels you can use your own choice of alloy brake pads – we like the Kool-Stop salmon pads for all round wet and dry performance.
Carbon braking performance.
In the early days of carbon rims the brake performance was substandard, especially in the wet. Modern high-quality rims like the Maker have addressed this problem and are as good as aluminium rims in both the wet and dry.
The first use of your fancy new carbon wheels may give a lackluster brake performance. As the brakes are used small amounts of rubber are deposited on the rim, and this increases the brake performance. For this reason it’s best not to aggressively clean the brake track of a carbon rim – instead just wash the bike as you normally would.
In general the feel of carbon brakes is quite different to aluminium – the brakes come on slower and feel less grabby as they’re applied. This doesn’t mean the brakes aren’t as good but it may require you to recalibrate your brain as to what is expected.
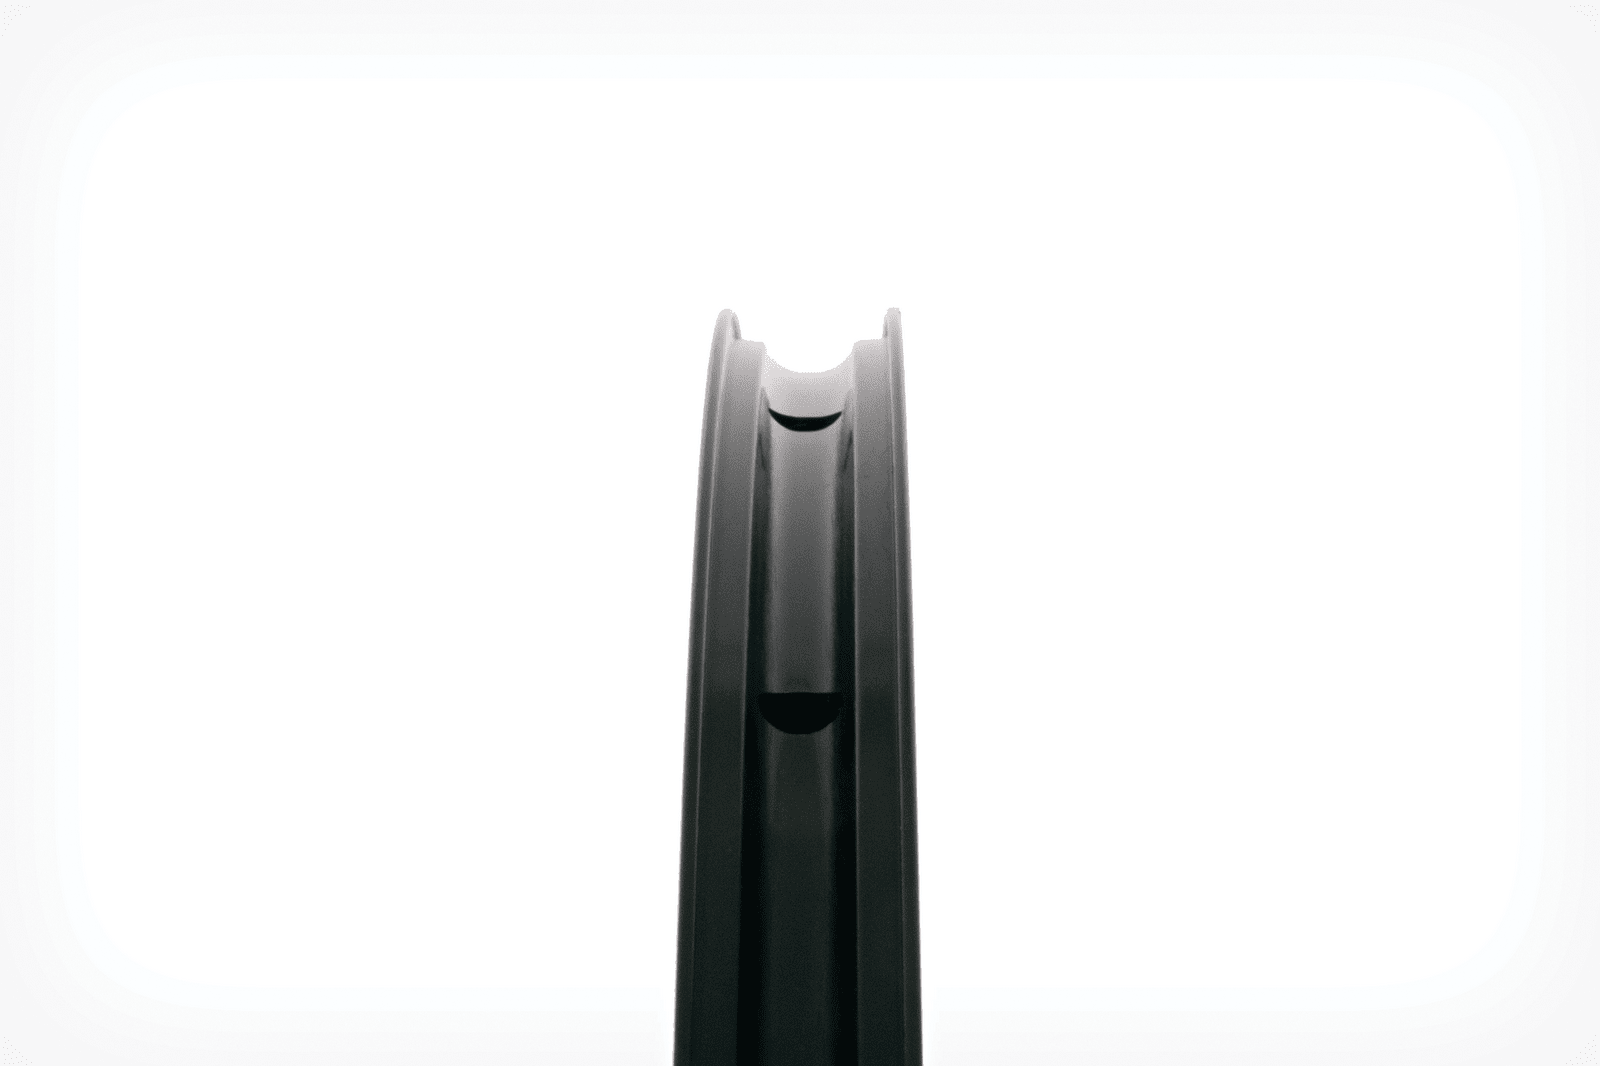
Brakepad placement
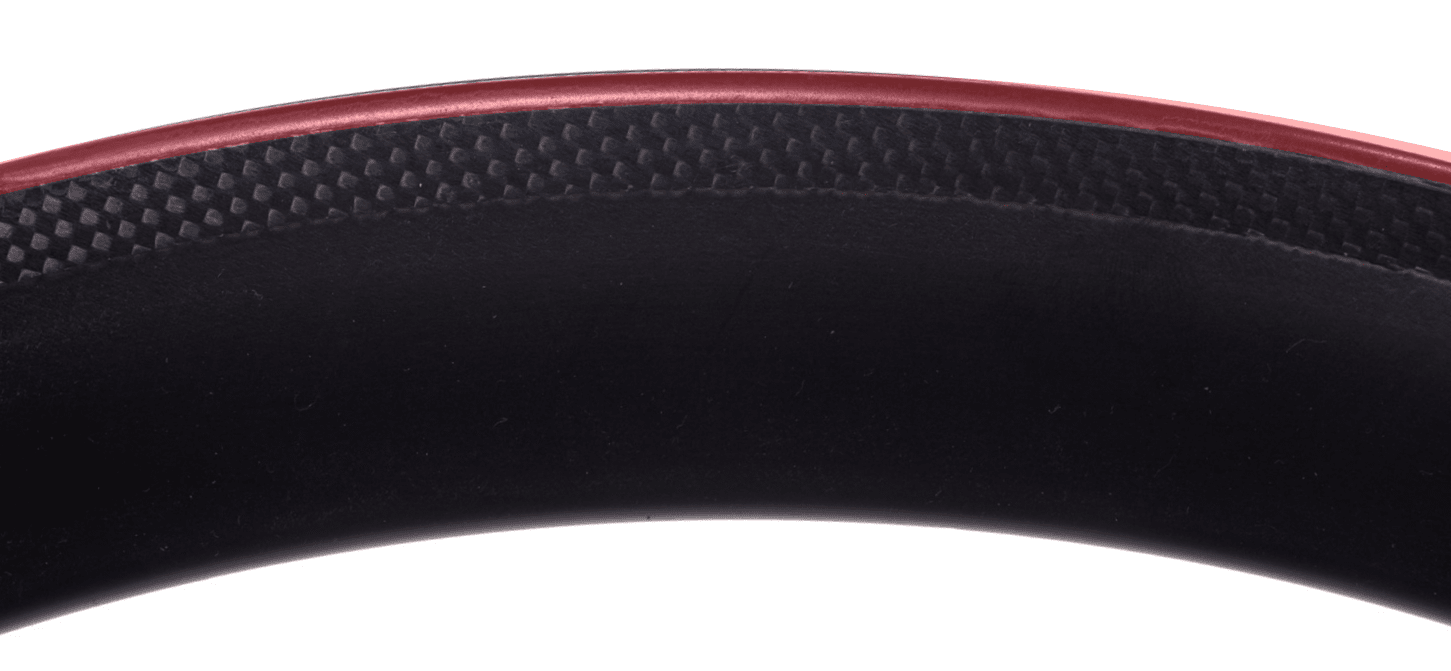
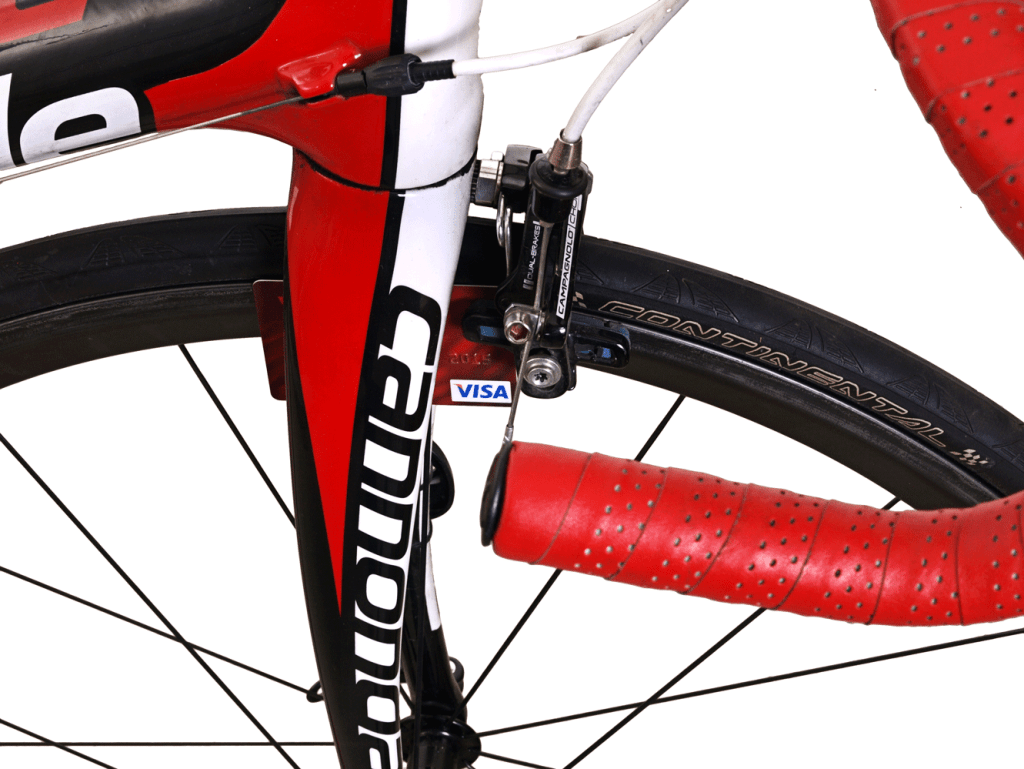
It’s extremely important that your brakepads contact the brake track on the Maker rim. The brake track is the textured section where you can see the woven high temperature cloth which is especially designed to handle the demands of braking. Pay very careful attention that the brakepads are not too high (highlighted in red below) or too low. Failure to have the brakepads contacting the brake surface may result in damage to the rim. This applies to both carbon and alloy rims.
Squealing brakes
Squealing on both aluminium and carbon rims is generally a result of incorrect pad ‘toe.’ The front of the brakepad needs to contact the rim first – this is called toe.
The easiest way to toe the pads is to loosen the brake bolt and use the brake lever to squeeze a business or credit card between the pad and the rim. While still squeezing the brake lever tighten the brake bolt.
Dragging the brakes
As we talked about above carbon rims aren’t as good at dissipating heat as their aluminium counterparts. Dragging the brakes on a long downhill is bad for two reasons: First, all that heat produced by the brakes warms the air in the tyre causing it to expand and the tyre pressure to increase. In extreme cases the tyre can blow off the rim. Second, the heat in the rim can cause the carbon to melt. Needless to say both of these are things you want to avoid.
How? By not dragging the brakes! Either use the brakes or let go of them. If you do need to use the brakes to maintain speed then alternate between the front and rear brakes – use one brake hard with the other one completely off for a few seconds, then swap. This allows each rim to shed it’s heat and cool down. This isn’t as scary as it sounds but it is the one small trade-off for having a wheelset which is lighter, stiffer, and more aerodynamic than an aluminium rim could provide.
This is a very rare event that is even more unlikely to occur if the correct tyre pressures are used – Please see the information on tyre pressures.
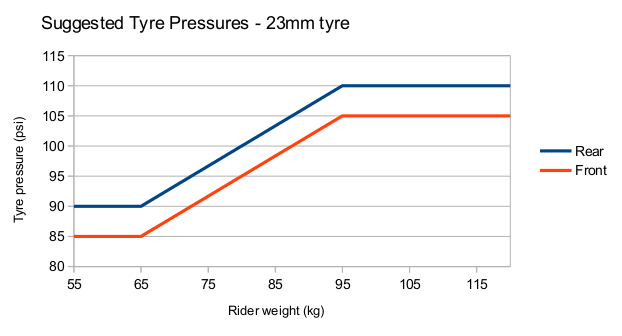
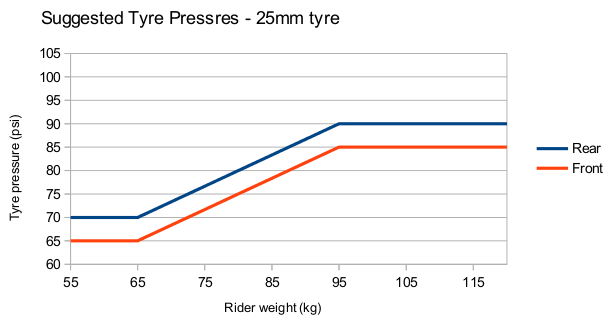
Suggested Tyre Pressures
The wide-rim concept of the rims used in your wheelset is designed to increase ride comfort and traction.
Critical to achieving these riding qualities is correct tyre pressure. The wider rim opens the tyre’s casing up increasing air volume inside the tyre. This increased volume allows the tyre can be run at a lower pressure without having an effect on rolling resistance or pinch-flat ability.
The lower tyre pressure and wider, rounder tyre improves the wheel’s traction and road-feel, especially when rolling into corners.
Alternatively try lowering your tyre pressure in 5psi increments until they feel under-inflated, then increase by 5psi.
Suggested tyres
Any clincher tyre between 23mm and 40mm will fit your rims. Our favourite is the Continental GP5000s in 25mm width which measures around 27mm on the Maker rim.
AYour Maker wheels are RoadTubeless compatible with the addition of tubeless valves. Please contact us for valves suitable for your depth of Makers.
Tubeless Ready
All generations of the Maker are tubeless-ready.
On Version 1 and Version 2 rims (35mm / 50mm / 80mm depths) it will be harder to get the tubeless tyres to initially seat, especially with brand-new tyres. The reason for this is because we designed the Maker before tubeless-road was something that customers were asking for, and before tyre makers were producing tyres for so we needed to take a conservative approach to how the tyre/rim interacted.
Version 3 rims (30mm / 45mm / 65mm) are much easier to install and seat due to tubeless tyre manufacturers settling on some common dimensions.
Hints on Fitting Tyres
Before we get started I’ve got a serious warning about Tubeless road wheels: ONLY proper RoadTubeless tyres can be used tubeless. Unlike mountain bikes the pressures on a road bike are so high that you’ll blow a normal tyre off the rim risking your own skin as well as those behind you. RoadTubeless tyres have the RoadTubeless logo on them.
Why is this hard?
In an effort to support tubeless road tyres rim manufactures need to make a few changes. The bead where the tyre sits needs to be far more exact in diameter, the height of the bead-seat needs to be decreased, and a ‘shelf’ needs to be shaped to the inside of the rim to help prevent burping (the tyres, not you)
These changes mean that fitting tyres on Tubeless-ready wheels is more difficult than with ‘standard’ rims.
These tips and tricks will help with installing tyres and can be applied to standard road wheels and tyres as well as the new generation of Tubeless rims.
A key difference with a Tubeless rim is the ‘gutter’ – a deep groove in the center of the rim. This gutter’s only purpose is to help install tyres.
|
|
|
|
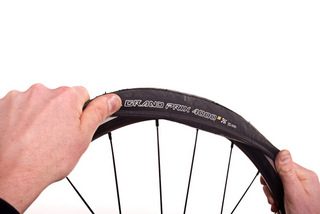
Install one bead of tyre as per normal. This bead will be snug but should goon quite easily. Install the inner tube and put a tiny bit of air into the tube. You just want enough air that the tube will hold it’s shape – too little and it will flop around, too much and it will be hard to fit. |
|
|
Install the tyre’s second bead ¾ around, leaving the section opposite the valve off the rim. |
|
|
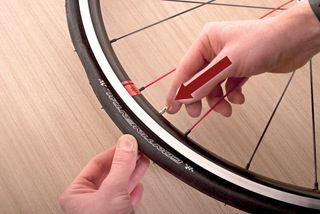
Now the tricks start: Start at valve and push the valve back into rim. We want the tyre’s beads to be able to get into the rim’s gutter so we’re moving the valve out of the way as much as possible. |
|
|
Pinch the rim’s bead together and place it into gutter. Continue this around the wheel – pinch the tyres bead and force it into the rim’s gutter, pulling the tyre away from the valve and towards the last bit of tyre you need to fit. This step is 90% of the magic. |
|
|
If you’ve done everything right thus far this final step will be difficult. If you’ve done anything wrong it will seem impossible. You’ve put the tyre’s bead into the rim’s gutter and moved as much of the ‘extra’ tyre to the final section as possible. Now either using your IronMan fingers or a plastic tyre lever push that final section of tyre onto the rim. If you’re using tyre levers be careful not to pinch tube – that little bit of air we put in earlier should help. |


Done! Whew! Take a minute to rest those thumbs then check that you haven’t pinched the innertube by going around the rim, starting at the valve, and pushing the tyre away from the rim’s bead. If you’ve got a small section of innertube trapped between the tyre and rim it will blow up when you inflate the innertube, thus taking you back to step one.
What cassette spacers do I need?
Over the past few years Shimano and SRAM have iterated their freehub body and cassette designs in order to accommodate more gears. This is good because it’s allowed us to have tight-ratio 11 speed cassettes, but bad because it’s caused a bit of confusion around the myriad of spacers which may or may not be required.
| Shimano 11 or Sram 11 cassette | No spacers are required. |
| Shimano 10 cassette | You’ll need to fit a 1.85mm spacer PLUS the 1.0mm spacer which was included with your cassette. |
| Sram 10 cassette | You’ll need to fit a 1.85mm spacer |
Remember: These spacers go onto the freehub body before the cassette.
Tighten the cassette lockring to 40N-m. If you don’t have a torque wrench this can be described as “pretty friggin’ tight!!” and you should have your forearm muscles bulging a little.
The lockring torque is essential to help with accurate shifting, reducing damage to the freehub body, and reducing creaking noise.
Exhaust Heat Warning
The following is from Enve but is also applicable to the Maker (and any other carbon wheel)
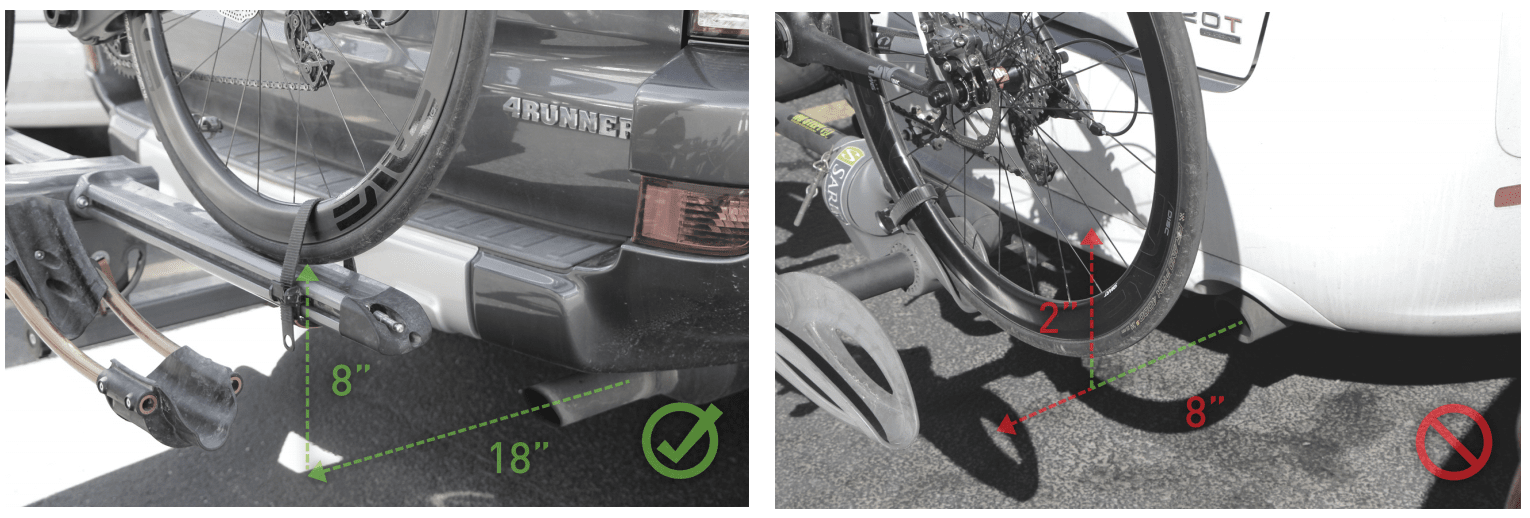
It has been brought to our attention that certain bicycle transport methods and vehicle/bike rack combinations are placing the wheels and tires of the bicycle too close to the vehicle’s exhaust system. Positioning a carbon rim too close to the exhaust may result in softening of the resin which can irreparably damage the rim. If the bicycle tire itself is too close to the exhaust region of the vehicle the tire may melt and blow as a result.
To prevent this from happening to your wheels:
• Ensure that the Carbon Fiber bicycle rim is well outside of 18 inches (45cm) away in any direction from the
exhaust pipe of the car. Similarly, the rim must be out of the direct path of the exhaust, even if it is
further than 18 inches (45cm) away.
• Aside from roof racks, wheel cradling hitch style racks tend to provide the most favorable and
adjustable positioning of your bike in relation to the exhaust pipe of most vehicles.
• Strap style trunk racks and tail gate pads are the most likely systems to position on the wheels of your
bike in front of your vehicle’s exhaust pipes.
• Do not leave your vehicle idling for long periods of time if your bike is on the rack.
• Do not lean your wheels or bicycle on or near the exhaust pipe of your vehicle.
• Please note, this damage has also been found from other external heat sources such as, but not
limited to; Heat Gun, Space Heater, etc.
![]()